How to Implement ATCO Rostering Automation with SkyRoster: A Step-by-Step Guide
- Emil Marina
- Aug 27, 2021
- 6 min read
Through ATCO Rostering Automation, Air Navigation Service Providers can leverage the power of technology to simplify the complexity of ATCO Rostering. Automated rostering platforms can compute the manning to cover a predefined demand, generate the necessary shifts and automatically assign employees to them so that all rostering constraints are met.
The challenge is to find the optimum schedule for the desired KPIs - better employee satisfaction and wellbeing, cost reduction, less overtime or fewer delays.
SkyRoster helps ATCOs to Work Less for More. ATCO Rostering Automation empowers ANSPs to adapt scheduling to planning disruption in real-time, employees to work fewer night shifts, deal with unplanned overtime, and mitigate fatigue risks. This results in happier & healthier ATCOs, but it also decreases the staffing costs and saves the time spent on manual rostering.

Today we'll learn how to get started with the SkyRoster Cloud Platform and start experiencing all these benefits. You will find in this article how to Sign-up for the SkyRoster Free Plan, how to configure the application and create your first automated ATCO Roster.
How the onboarding process looks like, step-by-step
1. Sign-up for the SkyRoster Free Plan
In order to discover the power of the ATCO Rostering Automation, the first step is to sign up for the Free Plan at https://www.skyroster.com/pricing. Once the Free Plan is Selected, the Sign-Up option will pop up on the screen and you can choose to connect via Facebook, Google, or e-mail. Don't forget to activate the account. After the request will be approved by our business development team, you will receive the credentials and you will be able to connect to your new SkyRoster account.
2. Setup the Organization Settings
After connecting to the server you will be able to customize the settings for your organization. This step is necessary for reproducing the way that your ANSP is functioning.
Time settings. You need to set up the time zone of your ANSP, as well as the number of working hours per day.
Set the first day of the week in Week settings. In case of the working days are different than the regular Monday to Friday, this option allows you to change it (e.g., Sunday to Thursday).
Request settings. One of the most important functionalities is the management of duty and leave requests. All types of duties and leaves need to be added and customized. Either is a medical check or a refresher training, the task can be automatically added up as a duty request. The same as for emergency leave or the annual paid leave. Make sure you define all types of duty and leave requests in order to reflect the ones that you have in the organization.

3. Configure licenses data in Competency Management
The Competency Management module enables the admin of the platform to input, add constraints and track each licenses data for every employee. The benefit of the module is that both the Management and ATCOs have stored their licenses and can always check when is the time for renewal.
Define the requirements. Each requirement contains the name (e.g., medical check, language check), the validity which could be expressed either in days or permanent, and any other conditional validities, if necessary.

Add qualifications. The qualifications (e.g., Approach Departure Control, Tower Control, Area Control) can be also edited to contain as many requirements as needed. Each qualification can also have a permanent validity or a temporary one, expressed in days. Moreover, constraints like how many days in the past the ATCO should have been worked on a certain position can be added.

Qualification Matrix. After having the requirements and the qualification, the last step is to observe how many days each employee has left before the renewal.
4. Define Units and Staff Members in Human Resource Management
The Human Resource Management module enables users to manage and replicate their internal organigram, by creating a hierarchical structure of units, departments, and teams.
Units. It starts with the unit’s name, the possibility to allocate one head of the unit and the second head of the unit (after staff is defined), any contractual details like the number of allowances permitted, any carry-overs, overtime, and so on. As complementary details, there could be stored also the address of the ANSP and any contact information available (phone number or/and email address).

Staff. Having the units, the next step is to populate them with employees (see training video 9). Staff data is split into six categories. It starts with General Information: the name of the employee, its nationality, date of birth, the main unit where it belongs, the email for getting notifications, the phone number, or any contractual information.

The next option is the Unit Membership, where the ATCO can be allocated to work on any other unit, different than the main one.

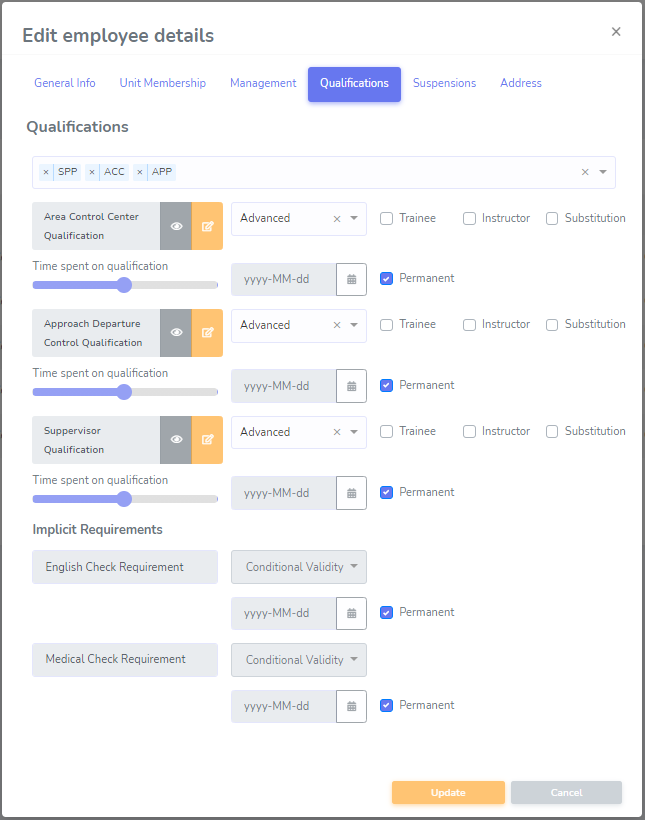
Moving further, there is the Management option, where the date of employment can be added, as well as the license number and job number. The fourth option is called Qualifications. All assigned licenses can be managed in this section. You must also select the rank of the controller, to mention if s/he is a trainee or an instructor, or if any of the qualifications is a substitution.

The last two options are the Address of the ATCO and Suspensions (if any).
5. Input staff leaves in Leave Management
The Leave Management module is the most important part of the pre-tactical phase of the planning. ATCO Rostering Automation empowers users to adapt scheduling to disruptions. This is the place where the leaves can be added. Three implemented functionalities come with benefits for both ATCOs and managers. For a better custom-tailored experience, it is recommended that all leaves and duty requests are added. The machine learning algorithms will then be trained to incorporate these constraints when working to design the roster.
Calendar. The calendar functionality is designed for everyone to show what are the working and off days. Here, each individual will add any desired or undesired days to be taken into consideration by the roster engine. Also, here is the place where all the leaves and duty requests are created and sent for approval to a manager. On the right side of the page, the current year allowances are also available. The numbers are updated once the leaves are taken, or any extra allowance is added.
Scheduler. This panel is specially designated for the supervisors and managers. All employees and their rosters are available for the current month, with the possibility to switch between months. The manager can also add duty and leave requests from this panel.
Requests. There are five types of requests that can be managed here: leave, duty, work, off, and swap. All requests that have been made and need approval or were already approved, will be found here.
6. Configure shifts and manpower requirements in Shift Planning
The Shift Planning module allows the roster planner to create and customize the shifts. The Shift Types can be defined by duration and starting hours.

After the shift types, if the ANSP is working after a certain pattern, the Shift Pattern can be defined as well. In the picture, you will observe an example of one of the most used shift patterns - MANOO.

The final stop is on the Manpower Requirement page (see training videos 7 & 8), where the demand and the working style are customized. SkyRoster supports both individual and team rosters. There are three options for patterns that can be selected: Sequence, Weekly, and Pattern-Based.
The Sequence MPR requires the user to select the qualification needed, then select the shift types and input the minimum and maximum numbers of ATCO necessary for that shift period.

The Weekly MPR is similar to the Sequence, with the mention that the requirements are made for each day of the week.

The Pattern Based MPR uses one of the Shift Patterns defined and requires the user to select the qualification that the MPR is designed for.

7. Create your first ATCO roster
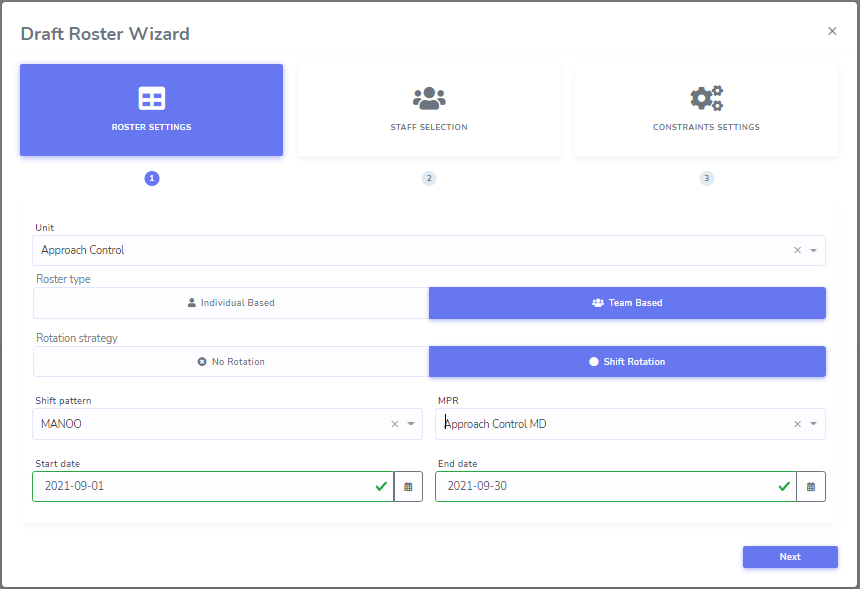
The Strategic Roster module is the place where the ATCO Rostering Automation begins. A draft roster can be defined and created. As mentioned before, when creating a new roster, there are three steps to be followed, in order to make sure that the outcome is the expected one.
Roster settings. The user can select which unit is the roster for, if the roster is individual or team-based, what are the rotation strategy, the manpower requirement, and the period when the roster should be created.

Staff Selection. The second step is to select the teams or employees involved.

Constraints settings. These are the rules that the engine must fulfill when generating a new ATCO roster. A set of constraints like respecting minimum rest time, fair distribution of shifts, prioritization of qualifications, distribution of nights, weekends, and many other options are available to enable/disable to have the roster optimized for certain KPIs.
When the engine is started, all parameters and constraints will be evaluated. The platform will display progressive updates while the roster is being built.

Start your ATCO Rostering Automation journey by signing up for a Free Plan at https://www.skyroster.com/, or Book a Demo to get in touch with us for an in-depth presentation of our platform.

コメント